
Fuser Overview
Learn what a Fuser is, how it works in a DMA setup, and how to identify its ports and controls before setting it up.
📺 What Is a Fuser?
The Fuser is a specialized hardware device used in DMA setups that combines the ESP overlay from your Radar PC with the live gameplay feed from your Game PC — displayed directly on a single monitor.
This eliminates the need to glance at a second screen or a laptop for visual information.
🎯 Purpose of a Fuser
The Fuser acts as a hardware overlay combiner, blending two video signals:
- Input 1 (Game PC): The unaltered game video output via HDMI or DisplayPort.
- Input 2 (Radar PC): The ESP overlay — boxes, outlines, and other visuals generated from DMA-read game memory.
By merging these signals, the Fuser displays cheat visuals directly on your monitor integrated with the game's native feed — without any software overlays like Moonlight, Discord, or OBS, which are more easily detected by anti-cheat systems.
💡 Indicator Lights & Button Functions
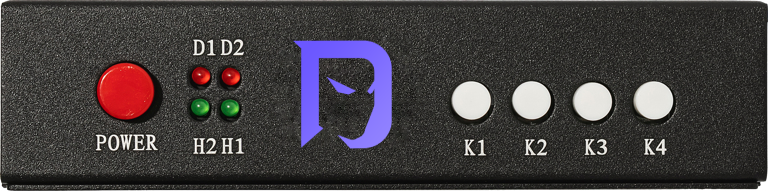
Indicator Lights
[D1]— Power indicator (solid when powered on)[D2]— Fusion function indicator (solid when fusion is active)[H2]— DP secondary input signal indicator (solid when functioning normally)[H1]— DP primary input signal indicator (solid when functioning normally)
Button Functions
- Power — Power switch
- [K1] Secondary Screen Mode — Displays only the 2nd PC screen, disables the main screen
- [K2] Main Screen Mode — Displays only the Game PC screen, disables the 2nd screen
- [K3] Fuser Activation & Adjustment — Enables the fuser and adjusts overlay strength (black level)
- [K4] Factory Reset & Re-engagement — Restores factory settings and re-engages the fuser if needed
🔌 Port Guide

- Output — Connect to your primary display. Only the Fuser should connect to your main monitor.
- Input 1 — Connect to the GPU of your Game PC.
- Input 2 — Connect to the GPU of your Radar (2nd) PC.
- USB-C — Used only for flashing EDID. (Outdated as now automatic)
- DC 12V — Power input.
Next: Once you understand the layout, proceed to BAAN Fuser Setup to connect and configure your device.